A design blog to capture a collection of thoughts from a bowerbird who is in love with unique design - fashion, furniture, art, photography, interiors, jewellery and creative minxes
Saturday, September 17, 2011
Summer Looks 2011-12
I've collected a range of images to inspire things to wear and make this summer (you can view them by clicking the below link). Have you started thinking about your wardrobe? My must haves include Lace (shorts, tops, dresses, anything!), red pants/shorts, floaty florals, bright bold colours (in tribal style prints). What are your must haves??
View my summer look book here
Lace Shorts - Inspired by Sincerely Jules (Blogger)
I’ve been inspired by the styles of blogger Jules from http://www.sincerelyjules.com/. I fell in love with an olive green and black lace skirt outfit that she had on and decided I needed to whip up something similar (see above image).
Using some non-stretch lace I had at home, I bought a gold zip and some stretch poplin for the lining. I’m so used to putting in invisible zips that I had a lot of trouble putting in this standard zipper (a bit of unpicking involved and a couple of you tube videos got me through).
I cut out size 6 but it was a little too small around the hips so I just reduced the 1.5cm seem allowance to 1cm.
The pattern didn’t have lining but due to the sheerness of the lace I had to put some in. I used cotton because I find that standard lining in summer is too hot and sweaty in Australia and cotton is much more comfortable.
It’s a really simple pattern and if made without the lining would only take 4 hours to make.
Thursday, June 30, 2011
The Estate of the late Alina Galasso – Auction this Sunday 3rd July 2011
Belonging to the late Alina Galasso – model, restaurateur and local fashion icon, the collection includes imported hand crafted Italian furniture including Vitrine, Sideboards, Sofas, Beds, Tables and Chairs. Fine Antiques including Victorian Rosewood Games Table, Georgian Chest of Drawers, Artworks by Lindsay, Anna Corsini, McDougal, Bronzes and Sculptures, rugs and fabrics.
The proceeds of the auction will help fund The Alina Galasso Trust which will provide three anual Scholarships to encourage and support students to achieve thier best whilst studying fashion and costume.
On View Saturday 2nd July 10am to 4pm and Sunday 3rd July from 10am
Fully Illustrated Catalogue online http://theodorebruceauctions.com.au/about_auction_news_view.php?article=374
Online Live Bidding will be available for this sale see links on our website
Sunday, June 26, 2011
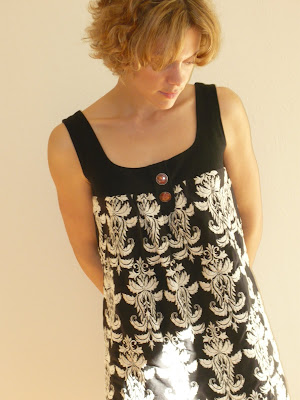
Simplicity "Project Runway" Mini Dress
I fell in love with the cotton Brocade before I decided what I could make with it. It's been sitting a home for a while so thought I'd pair it with some black linen to make a mini dress.
This mini dress was made from Simplicity pattern 3507 from the "inspired by Project Runway" collection. I used a black linen for the bodice and facing and then used cotton brocade? style fabric for the main section of the dress. I used the brocade scalloped edge as the hem. To do this:
1) I measured the exact length I wanted the dress before cutting
2) Lined up the paper pattern for the skirt part of the dress so that the hem would be sitting on the scallops.
This dress does not have lining.
I cut out size 7/8, but it ended up being a bit big. I’d recommend tissue fitting the pattern first before cutting to ensure a good fit.
I’m planning on wearing the dress as a tunic in winter over the top of a turtle neck and as a dress in summer.
Sunday, June 19, 2011
Handmade Leather Jacket... by me!
My leather jacket is finally finished after months of pattern making, adjusting, cutting, sewing and finishing.
It’s been a great adventure. Leather is beautiful to work with… a nice change from the slippery slide sewing of silk or nylon. Leather stays put and doesn’t require the finer finishes of softer or sheer fabrics.
I used a combination of patterns for this design. Starting with inspiration from this Muubaa waterfall jacket mink. I then used McCall’s pattern M5937 to give me a basic shape. I incorporated a block pattern I’ve made previously to give me a close fitting sleeve and made many adjustments on the dummy to get the lines I wanted. It’s lined in a matching colour and facing was done in the same leather as the front.
Leather was sourced from NSW leather Co. and I needed about 5 skins to complete the jacket, costing about $120 AUD.
I think I’d change the collar if I re-made it, but for the moment I’m content with wearing it the way that it’s turned out.
Ox
jacket in detail
Saturday, March 26, 2011
Launch of STUDIO2103
Tuesday, March 15, 2011
How far will $150 go at Kirribilli Fashion Markets?
Left to right: black ankle boots $15, new Witchery suede wedges $30, RMK heels $15
Left to right: wool/silk dress $10, Top Shop lambs wool cardi $10
Bangles $5 each
One of my favourite markets is the Kirribilli Fashion Market, which I visited last Sunday. With $150 in my pocket I was on a mission to find shoes, party clothes and some winter pieces. The day did not disappoint! For $115 I bought 10 pieces including shoes, tops, accessories and a skirt. I’m already planning my shopping list for next month….!
Sunday, March 6, 2011
My Green Thumb - Making a Terrarium
My terrarium - I would have like a vessel with a glass lid but this glass vase was only $10 and the one with a lid was $80.
Steps for making a terrarium (see below for full instructions). I found the chopstick rather helpful to create small holes in the soil to poke plants in.
Apartment living is not the best for the avid gardener, especially when your balcony is the size of a pea (like mine!). Hence, I’m always looking for ideas to improve the greenery around my house without sacrificing space. I’ve fallen in love with the concept of terrariums, little mini plant worlds that can live inside a glass jar, as a way to expand the garden at home. Today I finally had a go at creating one and I was pretty happy with the end result. I’ll post another photo when the succulents have settled in and they start to take a natural shape.
It was really simple to make:
Buy a glass jar/vase/vessel
Buy a selection of dwarf succulents
Put down a layer of horticulture charcoal
Then put some succulent/cactus potting mix on top (it’s more sandy than the normal potting mix)
Break up the succulents and start designing your landscape!
Water you terrarium….. presto! Fingers crossed it grows.
If you want more inspiration, there are many how-to tutorials on the web, this is one by design sponge http://www.designspongeonline.com/2009/08/made-with-love-found-terrariums.html
I'd love to see or hear about your terrariums so please email me or post a comment!
Sunday, February 20, 2011
Nanna Craft
It’s not often that both sets of grandparents’ are still alive and completely, “with-it” when you turn 29 (one set in their late 70’s and the other side 91!). I'm lucky enough to be in that situation and this weekend I spent time with with my mum's parents, Nan & Pop.
For as long as I can remember both of them have been making things with their hands. Growing up and living on farms conditioned them to be very resourceful and these skills have definitely stuck with them as they’ve aged. They both cook up a mean country meal with cakes baked using my great-grandparent’s recipes’ and pop is a natural craftsman with wood-turning.
Nan has been into needlecraft since before my mum was born. My school holidays were spent at their home with Nan teaching me an assortment of handcrafts - candlewicking, shadow embroidery, patchwork and dress making .I’m sure all were taught to keep me occupied and give her a little peace and quiet!
Yesterday, Nan showed me her current patchworking project, an origami patchwork wall hanging from, “Flower Origami” by Kumiko Sudo.
I fell in love with the perfectly folded fabric flowers and the contents from the Flower Origami book. It got me thinking about other applications for these little folded fabric flowers. Stitched together they’d make a beautiful cushion cover or add a pocket and it could be a purse. You could even string them together to make a garland decoration – possibilities are endless!
Nan was horrified when I told her I’d put these pictures on the blog but I think her skill is something to share – what do you think?
Thursday, February 17, 2011
Colours for winter (continued)
To work out the colour combinations for my winter wardrobe, I’ve continued the colour mood board idea. This time, I looked at colours grey and camel and nominated seven matching colours that worked with each (and would suit my colouring).
Grey has been paired with denim blue, dark faun, black, ivory, khaki green, blush pink and mustard yellow.
Camel has been paired with black & white stripes, cream, olive green, burgundy, warm grey and denim blue.
Now that the colour boards are complete, I’ve decided to ONLY buy & make clothing items that match the following colours:
• Denim blue
• Khaki Green
• Burgundy
• Black (or black+white)
• Ivory
• Dark faun
• Blush pink
• Camel
• Grey
• Mustard yellow
This should result in a very functional winter wardrobe with lots of interchangeable outfits!
If you found this post interesting why not send it to friends!! If you would like to receive updates from Design Detective Diary please join me on Twitter or Facebook. Click Twitter or Facebook Fan Page links on the top right of this page to join.
Sunday, February 13, 2011
Chanel inspired tunic
I have a confession – I’ve jumped the gun with creating my winter wardrobe by purchasing fabric before I’ve finished designing! I knew it was going to end in $$ added to my credit card the moment I entered Tessuti's but the yummy Missoni fabrics and Fendi linings were too tempting to walk past (especially with a SALE sign out the front!)
the fabrics I bought...
From left: black/white wool (for a cape), terracotta cotton/stretch (for shorts), brown plaid wool stretch (for tunic), brown felt/cashmere (for coat), boucle (for tunic)
I had decided on the colours for my winter wardrobe, which helped me show a little restraint when choosing fabrics. I was able to cull my selection from 10 different wools, jerseys, cotton blends to 5 different types of fabric (are you proud of me Cade?)
I want to make a tunic for work, so the boucle (I think that’s the right word? Can anyone confirm what it’s called?) fabric in khaki’s, pink, brown etc. looked perfect. So hence, the drawing above of my Chanel inspired dress!
Vogue had a pattern sale on last week so I stocked up on 10 new designs. I bought pattern V8146 for the work tunic. I’m still undecided on whether I should make the matching jacket? What do you think? Is it too much for someone aged under 35?
Wednesday, February 9, 2011
French = Style
I was in Paris early October 2010 and while sitting ‘alfresco’ in the heart of the Maris I started doodling the fashion and style that was walking by (hmmm, actually, the word ‘doodle’ and ‘Paris’ should not be in the same sentence, maybe sketch would be a better word??)
Anyway, I re-discovered this ‘sketch’ today and I took the following inspiration for my winter clothes:
* Always wear a scarf
* Buy a chic umbrella (dodging puddles with a newspaper over your head is a total no, no)
* A tailored, cropped jacket works with most things
* Tights! (Note-to-self: stick at the gym)
* Tan ankle boots – winter staple
* Funky glasses will always make you look uber arty (think Johnny Depp)
* Stripe tops should be a mandatory
* Find THE perfect white shirt ASAP
* Update my ballet flats
* Can’t go wrong with grey, red, tan and black
Tuesday, February 8, 2011
Colour Boards + Trouser and Blouse Ideas
After trawling through images and magazines, I’ve started to refine what I want in my winter wardrobe. I’ve set a goal to make about 30% of items for my wardrobe and have them completed by the end of May! You, as my audience, can have front row seats as I sweat through each stage of the creative process!
I’m only in phase 1 (research), however please feel free to critique / comment along the way.
mustard yellow / gold colour board
I’m in the process of reviewing colour combinations for my winter wardrobe. I’ve decided to pair mustard yellow with indigo blue (denim), dark faun, black, cream, warm brown (copper?) burgundy (red wine) and warm grey.
I’ve also started reviewing patterns for a pleated pant and a front tie blouse based on some images I found at Hypeed. At the moment I like the Burda Style Marilyn Trouser #6065 and the McCall’s Misses blouse M5884, however both will need a bit of editing.
Next colour review will be camel…..
Sunday, February 6, 2011
Winter Wardrobe
I know it’s insane to be thinking about a winter wardrobe in 40+ degree C heat but that’s exactly what I did this weekend. I want to sew a few key pieces for my wardrobe this year, and given my track record, I need to start months in advance to get anything finished in time!
Working from my feet up I’ve started a mood board to decided what colours and styles I’ll work with this season.
Lula magazine always inspires me so that’s where I started….
At this stage my wardrobe will include some of the following:
Colours
Mustard yellow/gold/camel
Plum/burgundy/aubergine/berry
Copper brown/cinnamon
Burnt orange
Mushroom pink
Khaki
Taupe/grey/beige
Black
White
Denim blue
Inspiration
Feathers
1950’s
Ruffles
Bows
Sparkles/pearls
Lace
Leather
Drapping
Key Pieces
Black hat
Solid colour skirt
Blazer
Plaid button up
Mustard yellow cardi
Denim shirt
Sparkle top
Leather Jacket
Jersey+leather pants
Knit vest
Cape
Scarves
Silky camisole
Ankle boots
Oversize top/jumper
Roll neck top
Cowl neck dress
I drew these shoes from images I found on the net. I’ll use this as a starting point for the ankle boots I’d like to buy.
I’ll be sketching the other items I’d like to buy/make over the coming week and will be happy to share once their done.
Wednesday, February 2, 2011
Strawberry Fields
Tuesday, February 1, 2011
Limelight - Interview with Miss Be Designs (Wendy Rattray)
A selection of works from the Miss Be Collection
I met Miss Be last week and I’m in total admiration of her journey thus far. From humble bean counter to a shining new design talent in under a year, Miss Be is on the road to major success.
Originally from a small town in the North East part of Scotland, Miss Be moved to Australia 8 years ago. She’d visited Australia the year before and fell in love with our way of life.
Not long after returning to Scotland a transfer opportunity came up with her company so she packed her bags and moved to Sydney. Arriving mid week around lunchtime she was shocked by the number of Aussies who were drunk and disorderly in pubs all around Sydney. She’d heard how much Aussies liked to drink but didn’t realise it included weekdays – little did she know it was Australia Day!
Making jewellery was a hobby Miss Be started back in Scotland. Always the creative, she’d dabbled in painting and silver work but fell in love with resin. “I love how resin can capture time in a new contemporary piece”.
Starting with object art, Miss Be quickly moved into making resin jewellery pieces. Spending time on her hobby after work and on weekends, she refined her techniques. “Resin is a very manual medium to work with. It takes a lot of practice to finish without any imperfections. It’s affected by so many things like temperature, time of day, time of year…”.
Feeling frustrated and bored in her accounting job, she found herself moving between companies trying to find happiness. “It took a long time before I realised it wasn’t the job it was me.” Wanting to break free into something more creative, a chance visit to a jewellery store in Paddington started the ball rolling. “The owner commented on the jewellery I was wearing and wanted to know who made the designs. It was the first time I thought I could make a business out of my hobby.”
Combining resin with man-made and natural objects such as clocks, leaves, fabric, and feathers, Miss Be collections preserve a moment in time and create a unique, wearable piece of art. “Just because a bird no longer exists doesn’t mean its feather can't live in a different form”.
Now 8 months on, Miss Be is busy in her studio handcrafting ten pieces of jewellery a day. Even with years of experience “the end result is still unpredictable…it’s a nice surprise when the mould comes off and the final product takes form.”
Despite demand for her work growing, Miss Be is 100% committed to keeping all her pieces individually handcrafted. “It would be easy to follow suit and bow to the pressure of moving to mass production to get costs down and increase margins, but I want to keep my work unique, special and made with love.”
This year, Miss Be hopes to produce a new collection every couple of months and she’s currently working on a range that will “…capture the seasons through flowers and colours.”
Miss Be designs can be found in retail stores in Sydney and Melbourne and the “Time” and “Nature” range is part of an exhibition at Painters' Gallery in Mona Vale NSW Australia. Miss Be has also exhibited at markets like The Finders Keepers and she has an online etsy store. Miss Be encourages anyone interested in her work to join her Facebook Fan Page to keep up to date with new collections, outlets and news.
I've owned my Miss Be “Australian pheasant square ring” for about a month and it's barely come off my finger! I can’t wait to add another Miss Be design to my accessory collection!
Sunday, January 30, 2011
Australian Artist – Rachel Carroll
I visited an exhibition at Painters' Gallery over the weekend and fell in love with the Australian bird studies by artist, Rachel Carroll. I bought three of her original hand-painted cards (see above) featuring a Manly Fairy-Wren, Kookaburra and a Rainbow Lorikeet. Such talent! I want to frame and hang them as a triplet series in the entrance to our house. Aren't they beautiful - if you click the image it should enlarge so you can see the detail!
The Painters' Gallery exhibition will continue until Saturday 5th February, 2011 and more information about Rachel Carroll can be found on her website.
Saturday, January 1, 2011
My Bryon Bay Shorts
I found a pair of shorts for $4 at the local thrift store. Using a seam ripper/unpicker I frayed the pockets on the back and then I cut them off to the correct length using my favourite shorts as a template. The length was short enough so that the bottom of the front pockets could be seen poking out. Then I frayed the bottom edges and put a couple of frays under the front pockets. I found this video on you tube that might help anyone wanting to DIY.